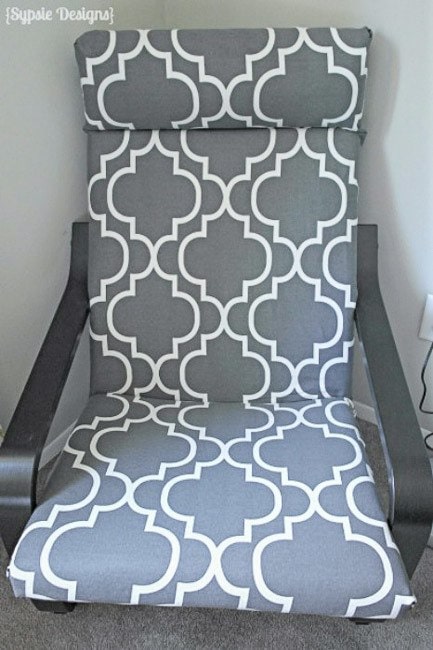
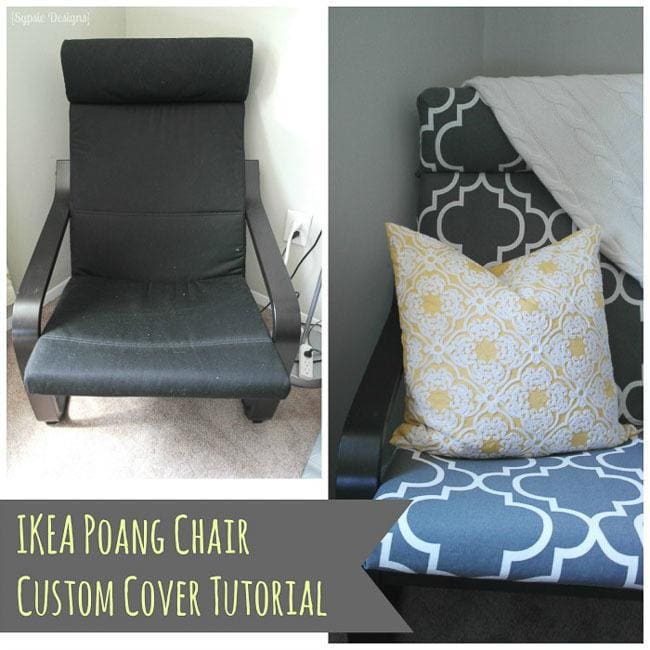
Have an IKEA Poang Chair but wish it had a more stylish cover? This tutorial will show you how to make a DIY IKEA chair cover from any fabric.
I’ve got another great guest poster this week! The sisters that make up Sypsie Designs are some of the best frugal DIYer’s I have seen. Every post, I’m impressed with their creativity and money saving tips. Over the past few months, we’ve bonded over a shared obsession with Target clearance finds and pretty much everything at Marshall’s.
Hi Polished Habitat readers! I’m Jodie and I run Sypsie Designs along with my sister, Paige, where we share all about our home décor ideas and furniture makeovers, big and small. We’re so excited to be here and share with you today!
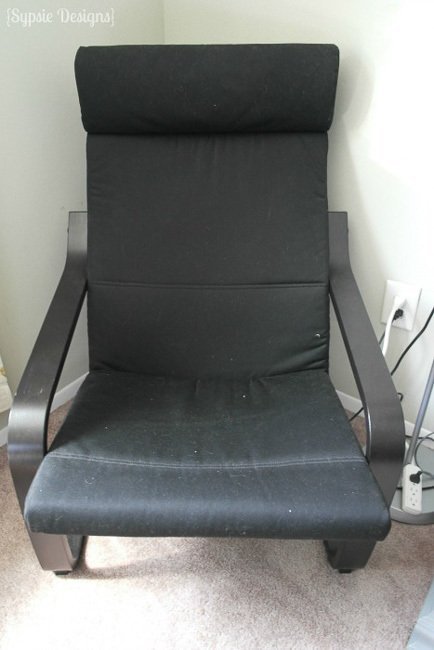
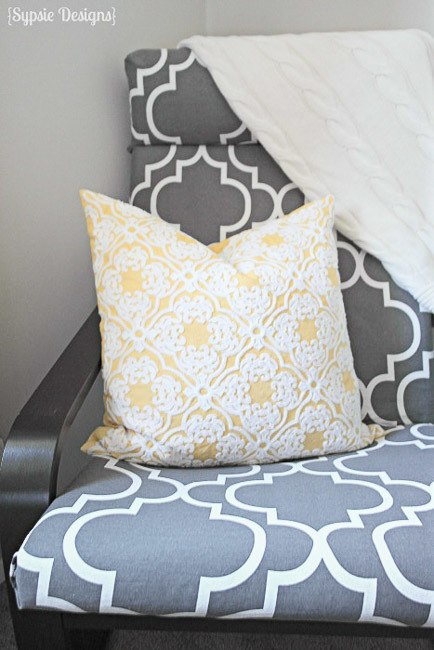
I recently moved into a one bedroom apartment with my guy, and have been working to update our space as frugally as possible- which means altering quite a few plain-jane IKEA furniture pieces to give them a bit of personality. Today I’m sharing how we made a custom cover for an IKEA staple, the Poang chair! Do you have one? I bet at least a few of you have your hands raised- they’re everywhere! They’re very practical, but I wanted something more fun than a plain black cover for our space.
It’s also useful at collecting fuzz and dust as you can tell. Not so pretty. To make the new cover, all that’s needed is a fabric shower curtain and a sewing machine. Don’t worry- it’s only 6 straight lines, and could even be completed with iron on hem if you’re not friends with any machines.
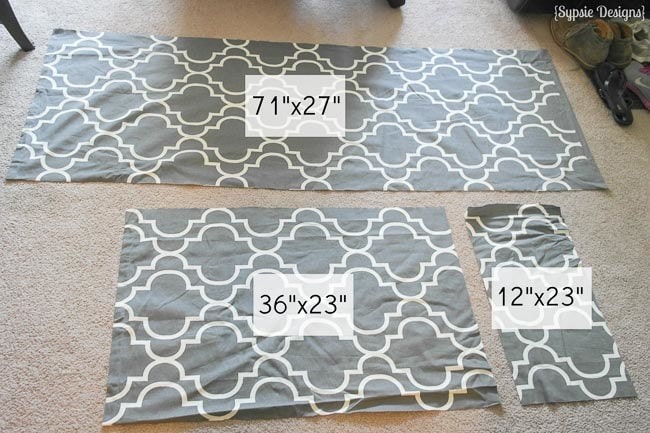
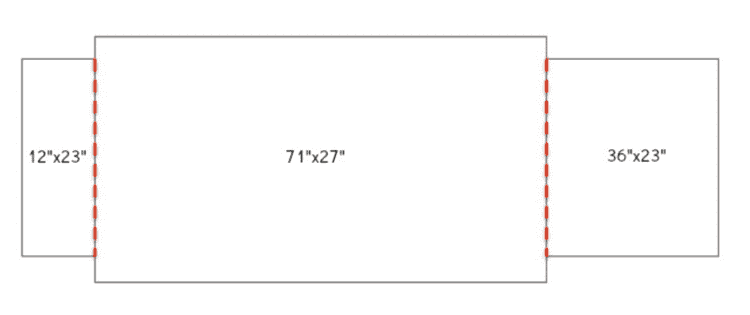
You will need three pieces of fabric- 71”x27”, 36”x23” and 12”x23”. My only tip here is to make sure that your pattern is centered when you cut out the pieces, especially on the 71”x27” piece for the front!
DIY IKEA Poang Chair Cover
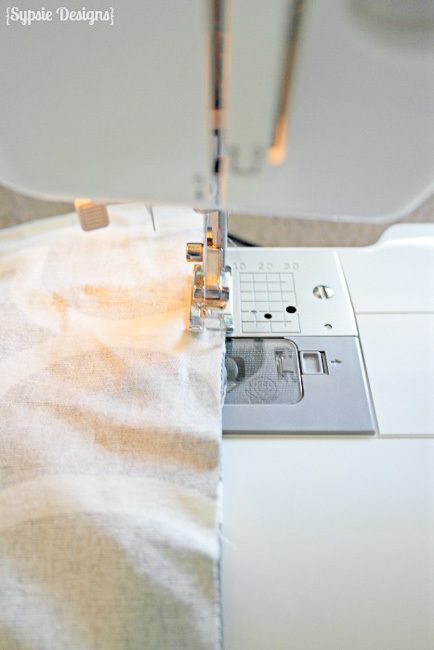
First, start off by sewing the three pieces together like so (on the red lines), making sure to sew the right sides together. They’re not the same widths, so just make sure to center the pieces.
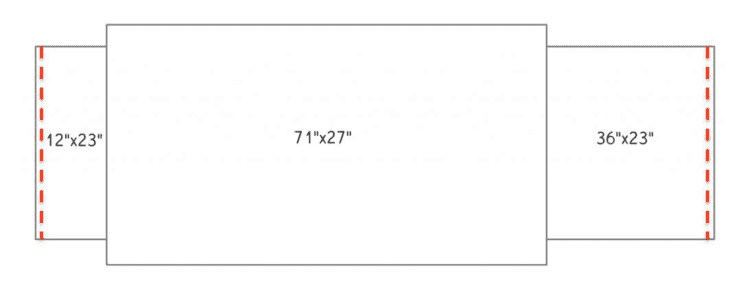
Next, hem both ends by folding over the fabric 1/2″ and sewing in a straight line on the red lines shown.
Four lines, down, two to go.
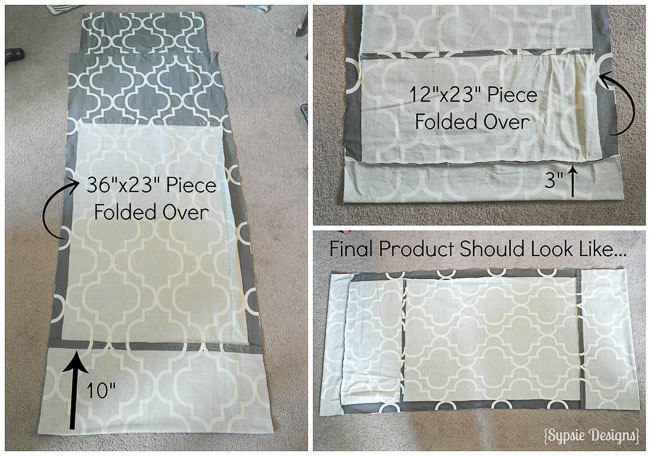
Next, with the fabric lying right side up, fold the longer piece (36” long side) over, 10” past the edge. Then, fold the shorter piece over (12” long side) over, 3” past the edge.
As you can see we’re essentially creating a simple envelope pillow cover for the cushion, but this version leaves you with no visible seams. They will all be hidden behind the chair and under the seat, so even if you mess up a bit no one will be able to tell- my kind of project : )
Next is the most complicated “looking” part, but it’s pretty simple. It’s time to pin. Only two more straight lines of sewing left!
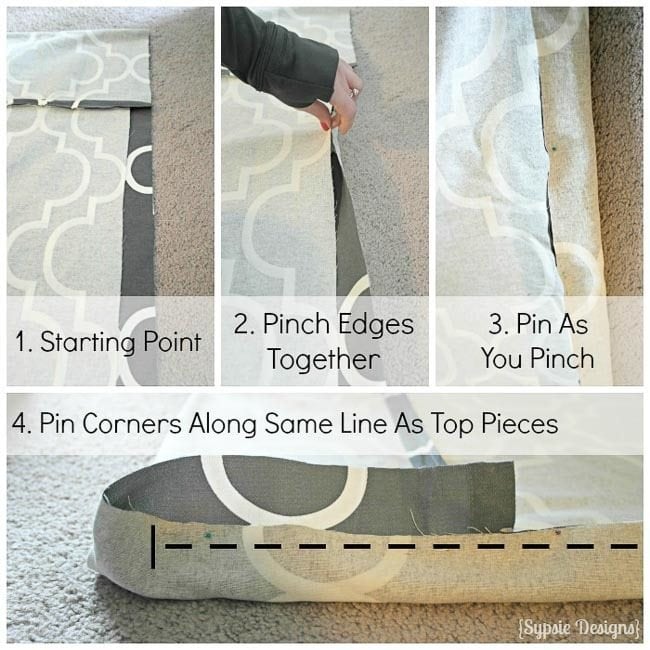
Start in the middle of one of the sides, and pin the edges together. The easiest way (since the fabric does not line up perfectly) is to pinch the fabric together and pin as you go. When you get to the ends, just keep the line the same, leaving about a 2 inch excess on the top piece.
After both sides are pinned, it’s time to sew the last two lines! Start about an inch from the end, and end about an inch before hitting the end of the fabric as well (see the black dashed line on the pic above for reference.) The corners can be tucked in after you’re done, allowing for that seamless look.
Flip that baby right-side out, and you’re ready to stuff in the seat cushion! We left the original IKEA black cover on to keep the cushion on one piece- keeping the cushions where they’re supposed to be (there’s 3 separate cushions involved if you take them out.) The envelope opening will go under the seat cushion and out of sight. After you’ve put the cushion back on the chair, simply tuck the fabric into the two creases at the back of the seat and head cushion.
SAMSUNG CSC
Fabric shower curtains are our favorite material to work with when reupholstering or working on small projects, since they can be found at stores like Marshalls for around $15 a pop! That’s very inexpensive considering the cost of that much fabric at a craft store, and all of the projects we’ve used them for have held up great so far!
I hope you’re inspired to personalize your own chair in a thrifty and unique way! Projects like this are great because you can change out the cover as often as you’d like, and you’re not stuck to one certain (or expensive) design choice. Especially if you change things up as often as we do : )


Katie says
This is beautiful!!! I’ve been looking for two chairs for our indoor front porch (that are budget friendly). I’ve seen these at IKEA a million times, but always pass on by. I just may reconsider now! I love fabric, and the options are endless. I’m newly inspired!! Thanks so much for the tutorial, Jodie and Paige!! Thanks for having these ladies, Melissa!!
XO,
Katie
Katie says
Thanks so much for this post. I just purchased the poang chair and ottoman at a thrift store for $8!! Only problem is that they didn’t come with any cushions, I was a bit intimidated to make my own but now I think I’m going to give it a shot!! Thanks again
TARA says
Hi I tried making the cover but stalled at the folding and pinning stage. I don’t seem to have the smaller edge in the correct place. I doubled checked that my pieces are of the correct size. Can anyone explain it to me please? The pictures are not clear to me. Thank you x
Jodie @ Sypsie Designs says
Hi Tara! I’m sorry it’s not lining up for you! The pinning stage is a little different than a standard pillow cover, but it’s so that your seam is not visible from the side of the chair. The smaller edge should be folded over 3″ and the sides are pinned in line with the largest piece of fabric, so there will be a couple of spots where you have about an inch overhang. If this doesn’t help- please feel free to email me at sypsiedesigns@gmail.com and I’d be glad to answer any specific questions!
Melissa George says
Thank you for helping Tara out!!!
Sarah says
This is great! I have two of these black chairs and you’re right they collect dust and fuzz like crazy. I love the idea of using shower curtains… so much cheaper than heavy duty fabric at the fabric stores. Plus, this actually looks like a project I can do. Thanks so much!
Sarah
Midwest Darling
Kevyn says
What size is the shower curtain? Is it 72 x 72?
misty says
fab tutorial! would only suggest a little more explicit directions in the step where we ‘leave an inch’ also – Poang chairs now (in Australia anyway) have the head piece separate and it has a piece to hook over the head of the chair – I just added ties to yours.
Caroline says
I realize this post is from last year, but I am hoping someone can help me! When sewing the three pieces together, you sew the 23″ side of the 12″x23″ side to the middle piece? And the 36″ side of the 23″x36″ to the middle piece, right? Or did I get this completely backwards?
Thank you in advance!
Katie says
I believe you sew the 23″ side to the middle piece. I’m a little stuck on the pinching and pinning portion myself!
Nada says
Hi,
Just completed my third cover! Am so happy to have found this tutorial. I use mine in the kids playroom (three boys), so you can imagine how many times I have taken the original covers off to wash them and wrestled them on again.
Thank you so much, my chairs look awesome. I found a fun, primary color shower curtain (another great tip), at Target for a great price. I found the directions straightforward, and by the third one I was an expert.
However, the one extra thing I did do was to treat my covers with Scotch Guard, as I already mentioned I have three boys and need the extra protection.
Thanks again
Melissa George says
That’s a great tip, Nada! Thank you!
Nonna says
Hi! What an absolutely great tutorial! I just got myself a poang chair and need to make extra cushion covers for backups… can someone tell me how many inches of fabric i need to add on each side if I wanted to use iron on hem insteas of sewing? Thank you so much!
Carmen Bojórquez says
Hi! I found this excellent tutorial, but I can not see the images. I wonder is there another way to visualize them?
Melissa George says
Hi Carmen, Something had happened to the images in this post without me knowing. It was written by a contributor so I’m having her find them all and resend them to me so we can get it fixed. Sorry about this!
Bethany says
Hello,
I know this is old but I saw this tutorial a few weeks ago and would love to try it but the images aren’t working any longer. Any way the images could be fixed?
Thanks!!
Bethany
Melissa George says
Yikes! I had no idea the images were missing like that, I’m so sorry! I’m emailing the people who wrote the guest post for me to see if they can send them to me. I’ll let you know when it’s fixed.
Sarah says
Hi there, I bookmarked this awesome pattern. I’ve got my fabric and machine all ready but there’s no pictures! Is there anyway they can be linked on another blog or as an open doc? I want to get started soon. Thanks 🙂
Melissa George says
Hi Sarah, a fix is on the way! It was a guest post by another blogger and the place she had the photos changed something, making them disappear from my site. She was finally able to find them and emailed them to me yesterday, so I’ll try and get them uploaded tomorrow. Sorry about the inconvenience!
Erica says
Hi there! Great tutorial! The shower curtain idea is the perfect solution to make my Poang chairs more sunroom-friendly. I’m trying to follow along but am having a hard time without the images. Do you have an update on when the images will be added back in, or where else we can find them?
Thanks so much!
Erica
Melissa George says
Hi Erica, This may be the most delayed response ever, but I just realized I hadn’t let you know that the photos for the Poang cover are back up with the post! Hope you have a great holiday season!
Jennifer Cummins says
Hello – I love this idea and cannot wait to try is very soon. I had a few questions:
Why did you choose to go with a shower curtain and not just fabric from a store (ease of use)? What material was your shower curtain made of? Do you recommend as specific material?
Also – do you have specs for creating a matching ottoman cushion? I’d like to reupholster ours with the chair.
THANKS!
Melissa George says
Hi! At stores like Marshall’s, you can usually find great shower curtain prints in sturdy fabrics for only $15 total. It can end up being a great cost savings over similar fabrics by the yard. Sadly, I don’t have an ottoman tutorial for you. I hope you love your chair cover though!
Jenny says
Thank you for this tutorial which I am attempting now. I am making them for my dil and as she lives far off I am making them without the actual cushions to try on. I don’t know which seam allowance to use and it is quite important if you want to make a good fit. Can anybody help me here please?
Shelley Fratianni says
Help! I have done all the steps up to the pinning, minus the ends. I have literally followed the instructions exactly but the photos and instructions are not quite as clear as might be desirable about the ackward top & bottom pining/sewing. It sounds like we are being told to continue to line up the raw edge of the less wide piece of fabric to within one inch from the end while matching the raw edge of that piece to the same width (meaning NOT matching raw edges but rather continuing the raw edge of the bottom piece in a straight line to the end minus 1″. That seems to be what photo 4 shows but the discrepency in widths makes mine all scrunched up and difficult to determine the ‘end minus 1″‘ unlike the tutorial photo. I am quite confused and my fabric is too expensive to muck it up! Does anyone have any further advice or photos? Thanks
Anna says
Hiya Shelley
Did you ever get this finished? I just made one this evening. I found the pinning bit was okay – when you’re carrying on pinning along the straight line (rather than carrying on putting together the raw edges) leave 2″ space on the wider raw edge then you know it’s definitely a straight line. When you get right up to the ends (the 1″ you don’t sew) it bunches a smidge but looks more like a fold when you’re finished and it’s on the cushion.
Hope that helps. Anna
Brooke says
Thank you so much for sharing this pattern! I was procrastinating making these for a long time, but I’m so glad I finally tackled it. It was much easier than expected, and the design is so clever. It looks fantastic! Thanks!
Maya Daly says
I’ve got a question. Does the fabric include a flap that goes around the frame of the chair to keep the padding/cushion in place?
Erin says
Oh my gosh I LOVE this, but I don’t trust myself to do it! Would you consider a custom order??
Melissa George says
Hi Erin, This was written by a guest author several years ago. I definitely don’t have the sewing skills to help, but would recommend asking local friends if they know a good seamstress who could make you one! I bet there’s a mom or grandma out there who would love a little side job!